 |
| ACL Editor | ||||||
| Step 3. Access mask editor | ||||||
|
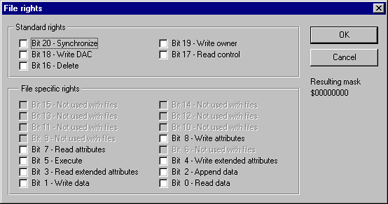
On this step we shall create a new form to allow access mask editing. As you remember the access mask is a set of 32 bits and each bit describes specific type of access. To be more accurate note that bits from 0 to 15 are used as a specific object access rights, bits 16-20 are used as common access rights. Some of other bits are reserved while other are used to get generic access rights. So our editor form will contain 20 checkboxes, checked box means that corresponding bit is set. There are nothing SvCom specific in this form so you can skip this step and continue with the next one. Well, create a new form and place 20 checkboxes on it. Our example will be used to adjust file's security so captions of each bit reflect the access types for files. Not all of bits are used with files so some of checkboxes will be disabled. So the resulting form will look like image below (run-time)
In spite of large number of controls on this form the event handling will be simple enough. To reduce the code size set the Tag property for each checkbox: it should be 1 = 2^0 for the Bit 0, 2 = 2^1 for the Bit 1, 4 = 2^2 for the Bit 2 and so on. The Tag property for the last bit should be equal to 1048576=2^20. After that we can use one common handler for all checkboxes. To add it select all checkboxes and set the OnClick event handler. Set it`s name to CBxBitClick. The body of this handler should look like shown below:
The _AccessMask is a variable that is stored in the form and holds the current access mask value. It is used to declare AccessMaks property for our form:
As you see the Tag property is used to set checkboxes checked/unchecked state. It allows to set checkboxes in cycle instead of duplicating the same code for each control separately. The final changes that we shall do is the AccessMaskText function. This function was used on the previous step to show readable access mask description and it is time to implement it:
Well, now you can test our application. After that only two steps remain in this example. With the first of them we shall implement the ACL editor itself and with the second we shall test it in different situations. Let's continue. |
||||||
| << | Index | Step 1 | Step 2 | Step 3 | Step 4 | Step 5 | >> | ||||||
| Add your comment | Read comments |
| © 1998-2001
Alexey Dynnikov |
|
